- Clothing Patterns 101
- Sleeve Styles
- Bell Sleeve
How to Draft a Simple Bell Sleeve
The bell sleeve is so simple, but it's a lovely addition to a dress, top, or blouse. It's gentle flare is feminine without being "fluffy".
A bell sleeve can actually take many forms, from the slight flare at the wrist shown below, to a much more extreme bell shape on a fitted bicep (think of a '60's bell-bottom pant leg, but worn on your arm!).
This page shows you how to create a sleeve using your blouse block. Don't forget to finish with hems and seam allowances!
|
The sleeves can be wide and flowy, or have an asymmetrical hem. Costumes often use a bell sleeve, in fantasy characters (a fairy princess or Snow White's Evil Queen) or in historical (mostly Medieval) costumes. We'll be drafting a simple bell, with just a bit of flare - where you want to take it from there is up to you! |

Drafting the Simple Bell Sleeve
|
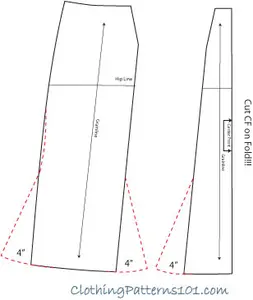
Start with your blouse sleeve block (not the fitted sleeve from the original block). Trace a copy of the pattern, do not alter the block pattern! Draw vertical lines along the grainline (from shoulder point to hem), and again on each side of the grainline, dividing the sleeve into four relatively even sections. Cut along those lines (we'll be using a "slash and spread" technique). |

|
Spread the pieces apart with about 1" between each section (this can be easily adapted for more or less flare when you make your muslin). Then add about 1" on each side seam for a bit more flare. Mark a point roughly half way between the underam and the hem (this is the elbow area) and draw a line flaring away from the side seam 1" at the hem. (The red dashed line is the original side seam of the blouse sleeve). This is part of what makes the sleeve a bell rather than just a wide sleeve. |

|
The pattern now tapers to the elbow (although it also has just a bit more room through the bicep than the blouse sleeve), then flares gently to the hem. This sleeve is so simple yet so beautiful. It makes the most basic blouse or dress a bit more special, and, depending on the amount of flare you choose, can also add quite a lot of drama! |

Drafting a More Dramatic Bell Sleeve
|
For a more dramatic look, you can draft the bell a bit wider - or MUCH wider, as you prefer. We'll be going quite a bit wider, although, as the sketch shows, it's still not extreme. This method, however, allows you to go as wide and full as you'd like. It's really just a variation on the method above. |

|
You will, again, start with a tracing of your blouse sleeve pattern, not the original sleeve from your dress block. Instead of marking and slashing the pattern from the cap, mark your slash lines from the elbow line of the pattern to the hem. Make the lines about 1 1/2" apart (this does not need to be precise, but you'll need about 6 slash lines). |

Next, you'll cut along your lines, but it gets a bit tricky so follow carefully!
|
Cut along the slash lines from the hem to the elbow line. Cut VERY CLOSE to the elbow line, but do NOT cut through the line. Then cut ALONG the elbow line (just SLIGHTLY above the slash lines) from side to side. It’s okay to start in the center of the elbow line and cut from the center to the two sides. Spread the pieces as wide as you’d like - the diagram is about 2” apart, but you can spread them much more if you desire. The outer pieces should not be spread more than 90 degrees, though. The more severe the bend at the elbow, the harder it will be to stitch. The elbow line will dip in the center as you spread the pieces. |

|
Finally, trace the new shape to another piece of paper, smoothing the curve on the sides of the pattern (at the elbow). Be sure to "true" the pattern piece, checking that the sides of the pattern piece match each other precisely. Of course, this is something you should do with any pattern piece, but a piece with this much curve and flare can easily go awry, with one side longer/shorter or wider than the other. That makes it impossible to stitch, and can throw the whole sleeve off-grain. But it's a really beautiful sleeve once it's drafted correctly! |

What's the Next Step?
You can add this sleeve to almost any dress, blouse or top. Then choose your neckline or collar and you'll have a stunning new addition to your closet.
The bell works so well with almost any body style or neck treatment - it's one of my favorites and I use it often!
Remember to add seam allowances and a hem to your final pattern, and you're ready to go!
Explore More Sleeve Styles


Return to Clothing Patterns 101 Home Page
ClothingPatterns101.com does not sell the personal information of its users to anyone, ever.
What's New - The Latest News in Sewing and Recent Articles on ClothingPatterns101
-
Add Flare to Your Gored Skirt with a Trumpet
 A trumpet skirt is a gored skirt with flare added at the hem only. The result is a skirt that fits closely through the hip, then flares out like a trumpet!
 -
Waist treatments finish your pant or skirt with style
Waist treatments finish your skirt or pants with style. Opt for a simple waistband, or something more decorative! -
Add a Waistband to Finish Your Skirt or Pant
A waistband is the most common finishing touch for a skirt or pant. It allows the garment to "hang" freely from the waist while allowing ample room for movement.
)
Tips and Techniques!
Watch videos that demonstrate the techniques you will use to design your patterns. And get tips to make the process easier!
Videos are added periodically, so keep checking back!
- More on Pattern Manipulations to Move Darts and Add Fullness
- More on Using Quarter Scale Patterns
- Style vs Fashion - Do You Know the Difference?
- Patternmaking Tools to Get You Started
- How Collars Work
- Sewing Gifts for Your Friends - or for You!
- The Difference Between Sewing Ease and Style or Fit Ease
- Do You Speak the "Language of Patterns"?
- Even the Greatest Style Falls Flat if it's Out of Proportion
- Where Do You Find Design Inspiration?
- Do You Have Trouble Fitting The Bust?
- What are Style Lines?
- Flat Pattern vs. draping
- The Difference Between Fit Ease and Style Ease
- Don't Make MY Mistakes! Do a Proper Muslin Fitting
- What Does It Mean to "True Your Pattern?"
- Using Basic Pattern Techniques
- Customize your Body Form
- Slashing and Spreading your Pattern to add Fullness
- Turning your Darts into Styling Details
- Using your Quarter Scale Patterns
- Why Do I Need Darts? They're so UGLY!
- Why Do I Need a Dress Block? Can't I just re-design a purchased pattern?