- Clothing Patterns 101
- Blouse Styles
- Halter Top
Make a Halter Top to Stay Cool This Summer!
A halter top may feel a bit revealing, but it really "reveals" only your arms and upper back - nothing too risque about that!
The openness of the top at the arms, shoulders, and back offers cool coverage during the hot summer months.
Of course, you could make it a cropped length, which is more of a bra-top - that's entirely your choice. But I'm going to explain the basics - there are endless variations you can explore from there!
|
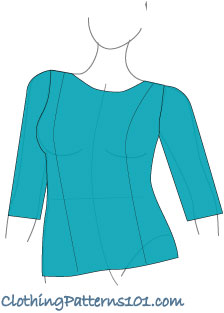
This halter top is waist length, has princess seams, and a shaped front neckline that is reminiscent of a sweetheart neckline. The sweetheart shape, in this case, comes from gathers over the bust at the center front seam, which pulls the center of the neckline downwards for a heart-shaped edge. This style also has straps placed widely apart and angling upwards toward the neck. The straps tie at the back neck. |


Drafting the Halter Top
|
Starting with a traced copy of your bodice block, begin by closing the side bust dart on the front bodice pattern. Draw a line from the point of the side bust dart to the center front line (shown in red). Cut along that line to the bust point, then close and tape the side bust dart. This opens the center front, allowing the front to be gathered over the bust. |

The next step covers a lot, but it creates the whole halter, so take it slow!
|
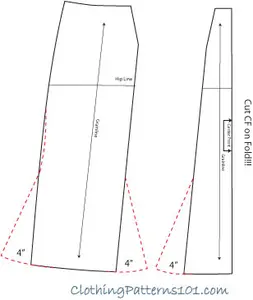
Using your traced bodice, tape the front and back pieces together at the side seams. This will help when drawing a continuous line across the side seam. You will separate them at the end. Then, draw a line from the point of the front waist dart to the shoulder/neck point. This creates the Princess seam. Tape some paper to the shoulder so you can draw the attached straps. (See the red dashed lines at left). Extend the Princess line 12” to create the strap. The strap is 1 1/2” wide at the shoulder. Drawing the other side of the strap, taper it to about 1" wide at the end. The line for the outer edge of the strap continues to the armhole, as illustrated (about 3/4" below the bodice armhole). Continue that line across the back of the bodice. |

Finally, draw the front neckline. To do this, draw another straight line from the center front to the Princess line. This line should be about 4” below the original neckline and at a 90 degree angle from the center front line (square this line to center front).
Cut along the red dashed lines, removing the original neckline area, and the upper back bodice.
|
Your final pattern will have 3 pieces: - the center front piece - you’ll cut 2 and seam them together, taking a tuck or gathering to size where the dart is shown. - the side front with straps - smooth the point where you cut the pieces apart, at the top of the waist dart to obtain a smoother Princess line. - the back bodice - The upper back is removed, but the dart remains for proper shape. This pattern is designed to be a top, but it can also be used as the bodice of a dress. For a top, you can close the center back with buttons (you will need to add an overlapping placket) or a zipper. Tie the straps at the neck - and you're off to the beach! |

More Blouse Body Styles


 |
|
Return to Clothing Patterns 101 Home Page
ClothingPatterns101.com does not sell the personal information of its users to anyone, ever.
What's New - The Latest News in Sewing and Recent Articles on ClothingPatterns101
-
Add Flare to Your Gored Skirt with a Trumpet
 A trumpet skirt is a gored skirt with flare added at the hem only. The result is a skirt that fits closely through the hip, then flares out like a trumpet!
 -
Waist treatments finish your pant or skirt with style
Waist treatments finish your skirt or pants with style. Opt for a simple waistband, or something more decorative! -
Add a Waistband to Finish Your Skirt or Pant
A waistband is the most common finishing touch for a skirt or pant. It allows the garment to "hang" freely from the waist while allowing ample room for movement.
Tips and Techniques!
Watch videos that demonstrate the techniques you will use to design your patterns. And get tips to make the process easier!
Videos are added periodically, so keep checking back!
- More on Pattern Manipulations to Move Darts and Add Fullness
- More on Using Quarter Scale Patterns
- Style vs Fashion - Do You Know the Difference?
- Patternmaking Tools to Get You Started
- How Collars Work
- Sewing Gifts for Your Friends - or for You!
- The Difference Between Sewing Ease and Style or Fit Ease
- Do You Speak the "Language of Patterns"?
- Even the Greatest Style Falls Flat if it's Out of Proportion
- Where Do You Find Design Inspiration?
- Do You Have Trouble Fitting The Bust?
- What are Style Lines?
- Flat Pattern vs. draping
- The Difference Between Fit Ease and Style Ease
- Don't Make MY Mistakes! Do a Proper Muslin Fitting
- What Does It Mean to "True Your Pattern?"
- Using Basic Pattern Techniques
- Customize your Body Form
- Slashing and Spreading your Pattern to add Fullness
- Turning your Darts into Styling Details
- Using your Quarter Scale Patterns
- Why Do I Need Darts? They're so UGLY!
- Why Do I Need a Dress Block? Can't I just re-design a purchased pattern?