- Clothing Patterns 101
- Blouse Styles
- Flare Top with Asymmetric Hem
Add An Asymmetric Hem to Your Flared Top
I love a flared or swing top for it's ease of fit and wear. And a swingy hem is a nice feature!
But an asymmetric hem adds even more drama, style and interest!
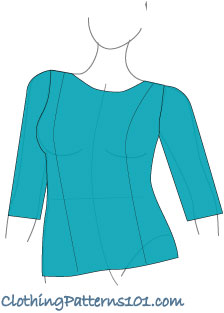
This top has 2 overlapping layers at the front, creating a "V" neckline, with points at the hem on each side.
|
The pattern is based on the extreme flare top. We've cut both the front opening and the hem along a diagonal curve, creating the "V" neck and asymmetrical hem. The hemline mimics the neck opening. This could be made as a wrap top (my version would have a LOT of buttons along the neck taping), or you could do a faux wrap by stitching the buttons through the layers, and topstitching along the trim to secure the neck opening. In either case, the layers would hang freely from about the waist to the hem. |

|
I've chosen to make the back hem straight, so the points are in the front only, one at each side. This style is inspired by one I saw online, and I liked the way it looked. You could easily add the points to the back as well, if you prefer, so they appear front and back. I'll briefly show you what that would look like at the end of the page. |

Drafting the Flared Top with Asymmetric Hem
The first step is to create a pattern for a flared or swing top. Since we've covered that part elsewhere, please refer to the linked page to begin. Once you have your swing top pattern, you can follow the steps below.
|
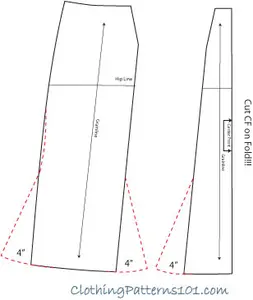
After making a copy or tracing the swing top pattern, draw the new neckline, which creates a deep V and ends at about the waist level. This is a wide, gentle “swoop” from the side neck (the left side neck, as you are facing the pattern) to the right side, halfway between the underarm and the hem. Next, draw the new hem shape. Starting at the left side hem, draw a curved line to the right, ending about 8” - 10” below the original hemline (at the right side). This shape will mimic the neckline. |

|
You’ll cut away the area ABOVE the red dashed line on the right side of the pattern, and ADD the area below the original hem. The final pattern piece for the front of the top will look much like the one at right. Add a notch (shown in red) along the longer side, showing where the bottom of the back top will meet the side. When you cut your fabric, you will cut two of these, and they will overlap, as shown below. |


|
Because the back has a straight hem, the back pattern is simply the same as the more extreme swing top. When stitching the top, the side seam of the back is stitched to the shorter side of the front. This will give you an actual overlap (secure each side with a button or tie). There is no need to secure the sides any more than that, as the overlap will fully cover your body. The front pieces will move freely at the hem. |

|
If you would like points on the back as well as the front, simply extend each side seam of the back top pattern to meet the length of the points on the front. Then draw a curved hemline, creating points at each side, keeping the highest part of the hemline the same as the original. |

That's all there is to it! The stitching can be a bit tricky, but just lay the pieces together, overlap, and you'll see where you should stitch and where you shouldn't.
Choose your sleeves (or make it sleeveless) and enjoy!
More Blouse Body Styles


 |
|
Return to Clothing Patterns 101 Home Page
ClothingPatterns101.com does not sell the personal information of its users to anyone, ever.
What's New - The Latest News in Sewing and Recent Articles on ClothingPatterns101
-
Add Flare to Your Gored Skirt with a Trumpet
 A trumpet skirt is a gored skirt with flare added at the hem only. The result is a skirt that fits closely through the hip, then flares out like a trumpet!
 -
Waist treatments finish your pant or skirt with style
Waist treatments finish your skirt or pants with style. Opt for a simple waistband, or something more decorative! -
Add a Waistband to Finish Your Skirt or Pant
A waistband is the most common finishing touch for a skirt or pant. It allows the garment to "hang" freely from the waist while allowing ample room for movement.
Tips and Techniques!
Watch videos that demonstrate the techniques you will use to design your patterns. And get tips to make the process easier!
Videos are added periodically, so keep checking back!
- More on Pattern Manipulations to Move Darts and Add Fullness
- More on Using Quarter Scale Patterns
- Style vs Fashion - Do You Know the Difference?
- Patternmaking Tools to Get You Started
- How Collars Work
- Sewing Gifts for Your Friends - or for You!
- The Difference Between Sewing Ease and Style or Fit Ease
- Do You Speak the "Language of Patterns"?
- Even the Greatest Style Falls Flat if it's Out of Proportion
- Where Do You Find Design Inspiration?
- Do You Have Trouble Fitting The Bust?
- What are Style Lines?
- Flat Pattern vs. draping
- The Difference Between Fit Ease and Style Ease
- Don't Make MY Mistakes! Do a Proper Muslin Fitting
- What Does It Mean to "True Your Pattern?"
- Using Basic Pattern Techniques
- Customize your Body Form
- Slashing and Spreading your Pattern to add Fullness
- Turning your Darts into Styling Details
- Using your Quarter Scale Patterns
- Why Do I Need Darts? They're so UGLY!
- Why Do I Need a Dress Block? Can't I just re-design a purchased pattern?