- Clothing Patterns 101
- Wrap Dress
Crafting a Wrap Dress
The simple wrap dress is a timeless style that was made famous in the 1970's by Diane Von Furstenberg. I doubt that she "invented" the style, but she made it iconic!
The silhouette is almost universally flattering, and is both easy to make and easy to wear. The dress adapts beautifully to any vibe, casual to sophisticated, depending on the fabrics and details you choose.
|
The wrap style usually has a V-neck, as a result of wrapping the bodice pieces - it’s difficult to achieve any other shape. It is fastened at the left side waist, often with ties, but sometimes with a button. The wrap style often has a fitted bodice, but it can have a soft, gathered drape as well. And it can use almost any style skirt - slim, full - even circular! |

The instructions below are for a dress much like the one shown above - fitted bodice and slim skirt.
Once you've learned the technique, you can create a dress using a more full skirt, or a softer bodice - just start with a top or skirt style you've already drafted, or refer to other styles on this site. The wrap technique itself should apply to all.
Drafting the Wrap Dress Bodice
For a wrap dress, make a FULL copy of both the bodice and skirt sections of your dress block. By this, I mean trace both sides of the bodice and skirt, ensuring that no pieces are cut on the fold.
|
On the bodice, start by closing the waist darts. To do this, cut the waist darts (extending the point of the waist dart to join the point of the side dart) and tape the waist dart closed. This will force the side bust darts to open wider, as in the sketch at right. |

Then draw the neckline. This is a curved line from the original side neck to a point at the other side, just above the waist.
The sketch above shows a relatively deep curve which will result in a deep V-neckline. For a more modest look, make the red dashed line a bit more straight.
|
Cut along the new neckline and separate the pieces. Remove the upper section of the bodice - you will not be needing it for the wrap. You will be cutting 2 of the new front pattern when you cut your fabric. |

|
When you cut your fabric and overlap the pieces, they should look like the sketch at right. The V-neckline is somewhat deep but not wide (that can be adjusted as you like in a fitting). Keeping the wider side bust dart maintains a smooth fit in the wrap bodice. |

You don't need to do anything with the back bodice, as it does not wrap.
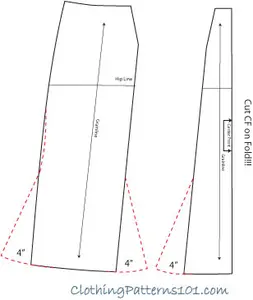
Drafting the Wrap Dress Skirt
|
Start the skirt in the same way you did the bodice - trace a copy of the FULL skirt. Create an overlap extension that is at least 7” wide at the hem. Draw the hemline of the extension with a slight curve upward (about 1/2") as shown. This will prevent either skirt layer from drooping at the hem. |

At the waistline, eliminate the darts on the extension (just fill them in) and draw a "tab" that extends further toward the side waist.
The exact measurement isn't too important, but that "tab" at the top should end within about 1 1/2" from the original side seam. (see red dashed line)
|
When you overlap your pieces, it should look like the sketch at right. When you make your skirt, the overlap will be on the right side of your body, with darts over the right side of your abdomen. The underlap will be on the left side of your body, with the darts over your left abdomen. The tabs are where you stitch your ties (or place your buttons, if that's your closure of choice). |

There is no need to do anything to the back skirt, as it does not wrap!
Stitching the Wrap Dress
This may sound complicated - hopefully, it will begin to make some sense!
When you make your dress, assemble the bodice and the skirt independently. Leave the top 1 1/2" of the right skirt side seam unstitched to accommodate the tie. Tack the top of the unstitched seam together so you can set the bodice to the skirt.
Then join the bodice to the skirt at the waist. The portion of the right side seam that is unstitched will be much like a large buttonhole.
Make 2 ties (width and method of your choice), one of them about 18" long, and the other ha2lf your waist measurement plus 18".
The 18" tie is stitched to the tab on the overlap (right skirt panel). The longer tie is stitched to the tab of the underlap (left skirt panel).
The longer tie will be inserted through the hole at the right side seam, wrap around your back waist, and tie at the left side.
Trust me, it will end up like the blue dress at the top of the page!
More Dresses


Return to Clothing Patterns 101 Home Page
ClothingPatterns101.com does not sell the personal information of its users to anyone, ever.
What's New - The Latest News in Sewing and Recent Articles on ClothingPatterns101
-
Add Flare to Your Gored Skirt with a Trumpet
 A trumpet skirt is a gored skirt with flare added at the hem only. The result is a skirt that fits closely through the hip, then flares out like a trumpet!
 -
Waist treatments finish your pant or skirt with style
Waist treatments finish your skirt or pants with style. Opt for a simple waistband, or something more decorative! -
Add a Waistband to Finish Your Skirt or Pant
A waistband is the most common finishing touch for a skirt or pant. It allows the garment to "hang" freely from the waist while allowing ample room for movement.
Tips and Techniques!
Watch videos that demonstrate the techniques you will use to design your patterns. And get tips to make the process easier!
Videos are added periodically, so keep checking back!
- More on Pattern Manipulations to Move Darts and Add Fullness
- More on Using Quarter Scale Patterns
- Style vs Fashion - Do You Know the Difference?
- Patternmaking Tools to Get You Started
- How Collars Work
- Sewing Gifts for Your Friends - or for You!
- The Difference Between Sewing Ease and Style or Fit Ease
- Do You Speak the "Language of Patterns"?
- Even the Greatest Style Falls Flat if it's Out of Proportion
- Where Do You Find Design Inspiration?
- Do You Have Trouble Fitting The Bust?
- What are Style Lines?
- Flat Pattern vs. draping
- The Difference Between Fit Ease and Style Ease
- Don't Make MY Mistakes! Do a Proper Muslin Fitting
- What Does It Mean to "True Your Pattern?"
- Using Basic Pattern Techniques
- Customize your Body Form
- Slashing and Spreading your Pattern to add Fullness
- Turning your Darts into Styling Details
- Using your Quarter Scale Patterns
- Why Do I Need Darts? They're so UGLY!
- Why Do I Need a Dress Block? Can't I just re-design a purchased pattern?