- Clothing Patterns 101
- Sleeve Styles
- Cap Sleeve
Drafting a Cap Sleeve Pattern
A cap sleeve is more of a decorative detail than a true sleeve. It does not cover the arm as a sleeve would, but it's a great-looking addition to what would otherwise be a simple, sleeveless, arm-baring top.
The instructions on this page are for the most basic cap sleeve. With some imagination, and using a combination of techniques (think "slash-and-spread" for fullness), you can create cap sleeves in a variety of styles to add drama or whimsy to your garment.
This page shows you how to create a sleeve using your blouse block. Don't forget to finish with hems and seam allowances!
|
Like its name implies, this sleeve consists of little more than the cap itself, and generally doesn't go all the way around the armhole. As a shoulder detail, it adds a bit of interest and coverage when you want something just a bit more than sleeveless, but less than a typical short sleeve. And it's easy to draft and to sew! I'll show you 2 versions. The one at left is a set-in cap sleeve, and I'll show you an extended cap later on. |

Drafting the Set-In Cap Sleeve
|
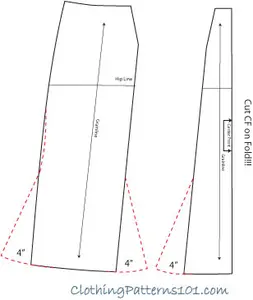
You'll start with your blouse sleeve block (the sketch shows only the upper part of the block, since we're making a very short sleeve pattern). Start by shortening the cap itself by about 3/8" - 1/2". This reduces (or almost eliminates) the ease at the cap; this little cap sleeve does not need it. Then mark a point on the grainline about 1 1/2" to 2" above the bicep line. Draw a line parallel to the bicep line at that point. |

|
The line you just drew is the height of the curve forming the bottom edge of the sleeve. Starting from about 1” below the sleeve cap notches, draw a gentle curve up to the upper line and back down to below the notch at the other side (as seen in the red dashed line at left). This curve is the hemline of your sleeve. |

|
The end result is a very short sleeve, which does not surround the arm. Be sure to mark where the sleeve ends on the front and back blouse pattern piece. |

For a very casual top, you might be able to turn and stitch the hem (depending on the fabric you've used), but this sleeve looks best with a hem facing or bias tape. The facing should be applied before setting the sleeve into the armhole.
The armhole itself should be finished with a facing or bias tape, too.
Drafting the Extended Cap Sleeve
|
The extended cap sleeve also works well and is even easier to draft. This version is simply an extention of the shoulder line. The “sleeve” is not set into the armhole, but is incorporated into the armhole instead. As a result, there is a seam at the top of the “sleeve”, so use this method with care. In some fabrics, the shoulder/overarm seam may stretch out of shape, resulting in a rippled or uneven shoulder area. |

|
Start by extending the length of the shoulder seam by 1 1/2" - 2". This is the length of your "sleeve". This line should dip a bit so that the end is a bit lower than the line of the shoulder seam (about 1/2" at most). The shoulder seam itself will curve from the neck to that sleeve point. From there, draw a curve connecting that end point to the armhole. This new armhold curve should end at about the front and back armhole notches. |

|
That's really all there is to it! Make sure that your shoulder seam has a consistent, smooth curve from the neck to the end of the "sleeve". The drafting sketch, above, shows it a bit lumpy, but the lines are smoother in the finished sketch at left. This version follows the curve of the body's shoulder and upper arm, and avoids the unflattering "wing" that would appear if you simply extended the shoulder seam in a straight line. |

To sew, just stitch the shoulder seams together first, then finish the armhole with a facing or bias tape.
What's the Next Step?
Decide on a blouse or dress style and a neckline or collar - soon you'll have a cute new summer style!
And don't forget to finish your pattern with seam allowances, hem allowance, facings - or whatever is required of your style.
Explore More Sleeve Styles


Return to Clothing Patterns 101 Home Page
ClothingPatterns101.com does not sell the personal information of its users to anyone, ever.
What's New - The Latest News in Sewing and Recent Articles on ClothingPatterns101
-
Add Flare to Your Gored Skirt with a Trumpet
 A trumpet skirt is a gored skirt with flare added at the hem only. The result is a skirt that fits closely through the hip, then flares out like a trumpet!
 -
Waist treatments finish your pant or skirt with style
Waist treatments finish your skirt or pants with style. Opt for a simple waistband, or something more decorative! -
Add a Waistband to Finish Your Skirt or Pant
A waistband is the most common finishing touch for a skirt or pant. It allows the garment to "hang" freely from the waist while allowing ample room for movement.
Tips and Techniques!
Watch videos that demonstrate the techniques you will use to design your patterns. And get tips to make the process easier!
Videos are added periodically, so keep checking back!
- More on Pattern Manipulations to Move Darts and Add Fullness
- More on Using Quarter Scale Patterns
- Style vs Fashion - Do You Know the Difference?
- Patternmaking Tools to Get You Started
- How Collars Work
- Sewing Gifts for Your Friends - or for You!
- The Difference Between Sewing Ease and Style or Fit Ease
- Do You Speak the "Language of Patterns"?
- Even the Greatest Style Falls Flat if it's Out of Proportion
- Where Do You Find Design Inspiration?
- Do You Have Trouble Fitting The Bust?
- What are Style Lines?
- Flat Pattern vs. draping
- The Difference Between Fit Ease and Style Ease
- Don't Make MY Mistakes! Do a Proper Muslin Fitting
- What Does It Mean to "True Your Pattern?"
- Using Basic Pattern Techniques
- Customize your Body Form
- Slashing and Spreading your Pattern to add Fullness
- Turning your Darts into Styling Details
- Using your Quarter Scale Patterns
- Why Do I Need Darts? They're so UGLY!
- Why Do I Need a Dress Block? Can't I just re-design a purchased pattern?