- Clothing Patterns 101
- Basic Pattern Techniques
- Drafting a Full Sleeve
How to Draft a Full Sleeve Pattern
A "full sleeve" may mean many things, from a short flutter sleeve to a long bishop sleeve with a cuff.
But the technique for making a sleeve full, with a nice drape, is essentially the same no matter the length.
To add fullness to a sleeve, simply trace your original block pattern piece, draw parallel lines where you want to add fullness, then cut and spread the pieces apart! It's that easy!
Please note: The following directions assume you will be using your personal block to create a full-size pattern. If you are practicing pattern drafting techniques or are experimenting with pattern design, I strongly recommend you print and use our quarter scale patterns.
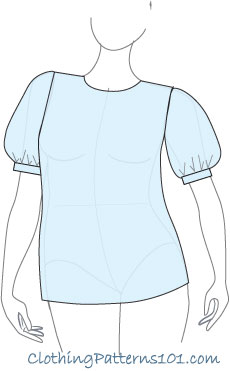
Puff Sleeve with Fullness Top and Bottom
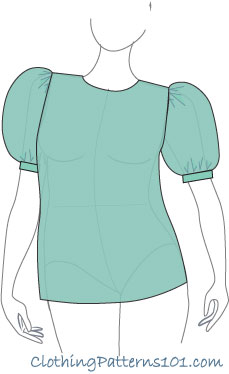
The version shown at right is classic, and is really the easiest variation.
This "puff" sleeve adds fullness at both the sleeve cap and at the bottom, and the bottom is gathered into a cuff (which we'll discuss on another page).
The puff sleeve is common in little girl's clothing, but if done well it can also be nice for women (I prefer a slightly longer length for women - a girl's puff sleeve is almost a ball shape).
I think it looks most elegant with a very small band or binding at the cuff.
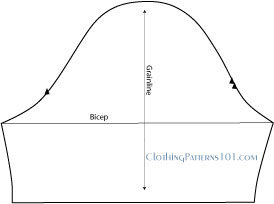
You'll start with the sleeve from your blouse block, which is already a bit less fitted than the original fitted sleeve block.
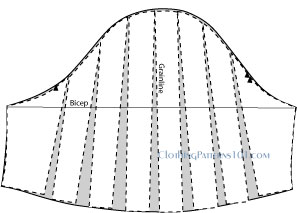
Trace your block pattern onto an inexpensive paper, like newsprint. You can use newsprint at this point because this copy will NOT be your final pattern. You'll use this copy to slash and spread, and will eventually throw it out.
In this case, I'm showing a short sleeve, so you can draw your bottom edge about 5" below the bicep line - this is generally a nice length, especially for a full sleeve.
DO NOT CUT YOUR ORIGINAL BLOCK PATTERN!
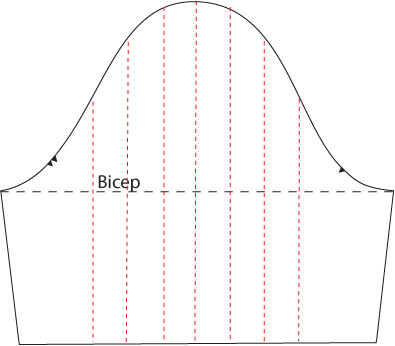
Draw 5 to 7 parallel lines from the sleeve cap to the hem.
You'll need at least 5 lines to ensure even distribution of fullness and maintain the overall shape of the sleeve.
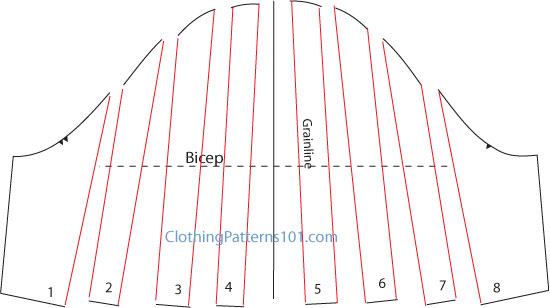
Cut along the lines to separate the pieces of the sleeve.
It's important to keep them in the proper order - if it helps to number the pieces, go ahead and do that! (The sketch below shows the pieces numbered to keep them in order).
Trace around the pieces for your final pattern.
As you trace the sleeve onto your final pattern paper, smooth out the curves, especially between the first and second pieces on each end.
REMEMBER: Your block pattern does not have seam allowances or a hem. Add seam allowances, a hem or cuff, grainlines, and all markings at this point.
You have a puff sleeve!!
Sleeve with Fullness at the Bottom
Another variation of the sleeve above has the fullness at the bottom of the sleeve only. This allows a nice shape at the bottom without adding height or width at the sleeve cap.
Without the cuff, this could be a flutter sleeve, very lovely in a soft, lightweight fabric for summer.
This can be finished with a thin binding at the edge, or a narrow one-button cuff.
I still like a distance of 1" to 1 1/4" at the bottom, but the top pieces remain touching at the edges.
Again, tape the pieces, lay them on your final pattern paper, and trace. Transfer all markings and add seam allowances, hem or cuff.
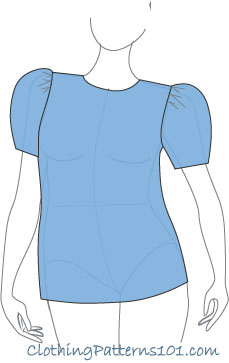
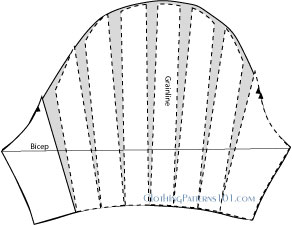
Sleeve with Fullness at Cap
Trace onto your final pattern paper, add seam allowances, hem, and markings, and toss the newsprint copy.
This method works for long sleeves as well as short.
Adding fullness to the bottom of a long sleeve results in a nice bell sleeve (without a cuff), or a simple full blouse sleeve (with a cuff). You can add fullness at the top, too, if you'd like.
A long sleeve with fullness at the top only is similar to a Victorian-era mutton sleeve.
And all 3 versions are based on your simple blouse sleeve!
Other Examples for Using Basic Pattern Techniques
Return to Clothing Patterns 101 Home Page
ClothingPatterns101.com does not sell the personal information of its users to anyone, ever.
