- Clothing Patterns 101
- Truing" and Finishing Your Pattern
Making Sewing Patterns "True" and Properly Finished
Making sewing patterns from your initial pattern draft requires "truing" and adding finishing touches to the draft.
After drafting, you may have what I call a "Frankenpattern". If you slash the pattern and spread for fullness, you probably taped more paper to fill the gap - or just taped cut pieces back together to close a dart, etc.
I like to make a "real" final pattern by re-tracing the final shape, and adding seam allowances, possibly a facing, and other details BEFORE I cut the final version.
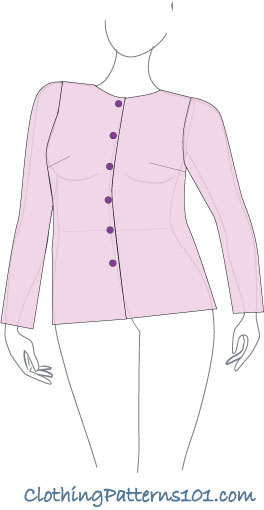
To turn your blouse block into a wearable garment, for example, the pattern must be finished and “trued”.
Seam allowances, a hem, facings, markings - that's what makes your pattern draft a real, usable sewing pattern!
Truing the Pattern
“Truing” your pattern means to make it “true”, or complete and correct.
Seams and corners must match to ensure easy assembly and correct balance.
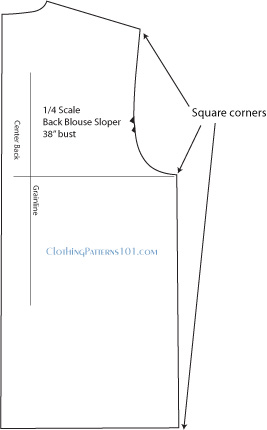
First, you’ll need to check that all of your corners are square. Corners that are not at a 90 degree angle will result in an uneven hem or intersection when sewing.
Use your grid ruler to check the corners at the shoulder/armhole, armhole/side seam, side seam/hem, etc.
Then check your side seams to make certain that they are the same length, and, if cut at an angle or with a curve, that the front and back are the same shape.
Adding Seam Allowance and Hems
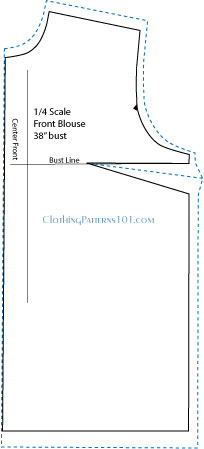
When everything is “true”, you’ll add your seam allowances.
The easiest way is to simply use 1/2“ seam allowances on all edges. Then, you can trim as needed along neck seams, etc.
Do not add seam allowance to the front - we'll address that a bit later.
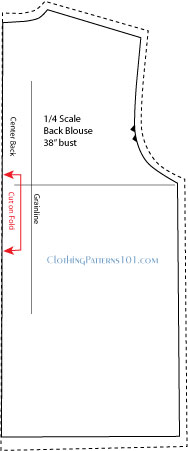
The seam allowances for the back are the same as for the front.
Add 1/2" seam allowances to the blouse sleeve, too.
Then add a hem (I usually use 1") on the bottom of the front, back and sleeve patterns.

The seam allowances and hem are the same on the back as they are on the front (remember, the seams must match when sewn, so don't use a different seam allowance or hem depth on the front and back!)
I've also added markings at the center back that indicate this pattern piece will be cut on the fold (see marking in red), so there is no seam allowance at the center back.
If you wanted to cut the back in two pieces and use a seam, then you'd add seam allowance at the center back.
Adding Facings and Markings
For a button-front blouse, you'll also need a facing to finish the front opening and neckline. And you’ll need an extension to accommodate
the width of the buttons.
This is a little more complicated to explain, but it's not hard to do!
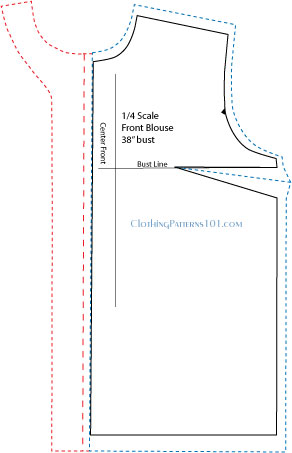
The buttons are set along the center front line, and you’ll need an extension to overlap the buttonholes and buttons.
The button extension is generally equal to the width of the button. For example, if you’re using a 1/2” button, draw a line (large dashed line) 1/2” from the center line. That's your extension.
The facing that finishes the opening and neckline can be sewn to the front edge, or you can add the facing to the front pattern and fold it back. Our
example is for a fold-back facing.
Fold the paper along the heavy dashed line (the button extension, NOT the center front line) (tape extra paper to the front edge of the pattern if needed), then trace the neckline, shoulder, and bottom edge of the pattern. Cut along these lines.
When you unfold the pattern, you’ll have a duplicate of your neck shape, shoulder angle,
and bottom edge. Draw your facing 2 1/2” from the cut edge of the fold-back paper. Your facing will be 2 1/2” wide.
Finally, mark your patterns with:
- Name of style and pattern piece (ie, Basic Blouse Front or Gored Skirt Side Back)
- Grainlines
- Notches or other markings for matching sleeve points, or any other points that will need matching during assembly.
- Buttonhole placement, if needed
- Any other markings that convey cutting or sewing information (ie, “cut on fold” at center back)
- Cutting information (which fabric, how many pieces to cut, na)
- Size, if needed
And voila! You've made your own sewing pattern!
The process for truing a skirt, dress or pants is essentially the same. Add seam allowances, hems, and markings. Facings, if they are sewn on rather than the fold-back version, can be traced from the
original pattern after seam allowances are added; 2 1/2” is generally a good width for most facings.
What's the Next Step?
Keep designing and making patterns!
You'll come up with many, many combinations of body style, neckline, and sleeves - and many new blouses and tops you'll be proud to wear. Continue with skirts and dresses, too - you'll soon have a whole wardrobe you've designed yourself!
Clothing Styles You Can Create Yourself!
Return to Clothing Patterns 101 Home Page
ClothingPatterns101.com does not sell the personal information of its users to anyone, ever.
