- Clothing Patterns 101
- Basic Pattern Techniques
- Drafting a Shoulder Yoke
How to Draft a Shoulder Yoke to Hide the Dart
Add Style Detail and Maintain Fit With a Yoke Seam
A shoulder yoke is more than just a style detail - it's also a way of "hiding" a bust dart! You can add style to your dress or top without a side dart, and still maintain good fit.
The yoke can run all across the chest, above the dart, which hides the dart in the yoke seam.
Or it can run from the neck to the armhole, closer to the shoulders, thus replacing the darts with soft shirring or pleats.
Please note: The following directions assume you will be using your personal block to create a full-size pattern. If you are practicing pattern drafting techniques or are experimenting with pattern design, I strongly recommend you print and use our quarter scale patterns.
Shoulder Yoke Across Chest

This simple tunic uses a yoke seam to add styling detail while maintaining the fit at the bust.
The side bust dart is pivoted to the armhole, and then the top of the bodice is separated from the lower portion to create the seam.
We won't go into any of the other details of this tunic on this page, but we will cover, step-by-step, the method of manipulating a dart into a yoke seam.
Start with your basic bodice block (in this case, you can also start with your torso/blouse block - the technique for moving the bust dart is the same).
Trace your bodice or blouse block onto an inexpensive paper like newspaper. This will NOT be your final pattern, so in this case, newsprint is fine. You'll cut this copy up and throw it away when you've completed your final pattern.
DO NOT MARK OR CUT THE BLOCK PATTERN. Make a copy first, and mark and cut the copy.
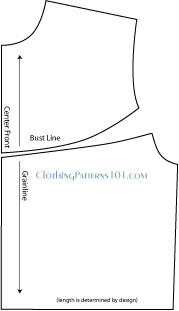
First, draw a line from the armhole to the point of the bust dart.


Cut along the new line, then close the side bust dart. (Tape it closed)
This will force the armhole dart to open. This is called pivoting the dart, and is used any time you simply want to change the position of a dart.
This gives you the basis for your yoke seam. You can now draw a line along the bust line to complete the yoke shape.
Following the lines of the darts, draw a curve that is pleasing. It doesn't have to follow the darts exactly, but it should be close.
When you cut along the new yoke seam, your lines should be nice and smooth - smooth the points of the darts when drawing your new seam line.
The wider opening at the armhole is your dart. When you sew the yoke seam, you'll still have shape over the bust because you still have the dart shape in your pattern.
Trace these pieces onto your brown craft paper, freezer paper, or whatever you use for your final pattern. You can then toss the newspaper pattern.
It helps to add a few marks along the yoke seam to aid in matching the curve as you sew the seam, but it's not necessary.
Shoulder Yoke with Shirring or Pleats
|
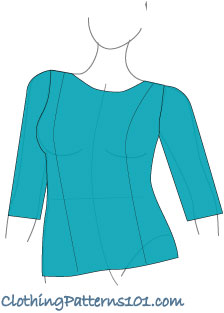
The version at left, with a higher shoulder yoke and soft shirring, is often used on a blouse that is a bit more dressy or professional-looking than the casual tunic, above. The side bust darts are replaced with gathers or soft pleats, which maintain the fullness required over the bust without the severe lines of bust darts. The drafting method is even a bit easier than the yoke across the chest! |

|
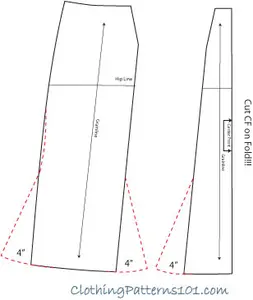
Start by manipulating the side bust dart, moving it to the shoulder. This step is explained more fully in the Princess Seam section, but here's a brief rundown: - Draw a line from the point of the side dart to the center of the shoulder seam (red dashed line) - Cut along that line. - Close the side dart and tape it closed. That will open a new dart from the point to the shoulder (the result is shown in the next step) |

|
Next, decide how deep you want your yoke to be. In this case, I am drawing a line approximately 2" below, and parallel to, the shoulder seam. The line runs from the neckline to the armhole (I've drawn it going across the dart |

|
Cut along the red dashed line, separating the yoke from the body of the front blouse. You'll have 2 pieces for the yoke, but tape them together at what was the dart. Then you will have a single yoke piece. On the blouse body, just fill in the dart, keeping the wider seam where it will join the yoke. You will gather that area to fit the yoke, replacing the dart with the shirring. Add notches if you'd like, to show where to start and stop the shirring (if you want to concentrate the shirring in the center of the yoke seam). Or, you could use tiny pleats to fit the body to the yoke. It's a similar look, but just slightly more tailored and sleek. |

In the illustrations above, I simply drew a straight bottom without a waist dart, which is how you would create a basic blouse or tunic style. You can keep the waist dart if it's needed for the style you're designing, but the tunic and blouse shown here would eliminate that dart altogether. Both styles are longer than the bodice block, so refer to the appropriate pages for designing the body of your garment.
REMEMBER: Your bodice or blouse block does NOT have seam allowances. After you've made your final pattern (including the proper length and shape of the top or dress), add seam allowances, hems, grainlines, and any other markings you find useful.
Yoke seams can be added to any top or dress. Using the bust dart to create the yoke seam maintains a smooth fit over the bust.
Other Examples for Using Basic Pattern Techniques


Return to Clothing Patterns 101 Home Page
ClothingPatterns101.com does not sell the personal information of its users to anyone, ever.
What's New - The Latest News in Sewing and Recent Articles on ClothingPatterns101
-
Add Flare to Your Gored Skirt with a Trumpet
 A trumpet skirt is a gored skirt with flare added at the hem only. The result is a skirt that fits closely through the hip, then flares out like a trumpet!
 -
Waist treatments finish your pant or skirt with style
Waist treatments finish your skirt or pants with style. Opt for a simple waistband, or something more decorative! -
Add a Waistband to Finish Your Skirt or Pant
A waistband is the most common finishing touch for a skirt or pant. It allows the garment to "hang" freely from the waist while allowing ample room for movement.
Tips and Techniques!
Watch videos that demonstrate the techniques you will use to design your patterns. And get tips to make the process easier!
Videos are added periodically, so keep checking back!
- More on Pattern Manipulations to Move Darts and Add Fullness
- More on Using Quarter Scale Patterns
- Style vs Fashion - Do You Know the Difference?
- Patternmaking Tools to Get You Started
- How Collars Work
- Sewing Gifts for Your Friends - or for You!
- The Difference Between Sewing Ease and Style or Fit Ease
- Do You Speak the "Language of Patterns"?
- Even the Greatest Style Falls Flat if it's Out of Proportion
- Where Do You Find Design Inspiration?
- Do You Have Trouble Fitting The Bust?
- What are Style Lines?
- Flat Pattern vs. draping
- The Difference Between Fit Ease and Style Ease
- Don't Make MY Mistakes! Do a Proper Muslin Fitting
- What Does It Mean to "True Your Pattern?"
- Using Basic Pattern Techniques
- Customize your Body Form
- Slashing and Spreading your Pattern to add Fullness
- Turning your Darts into Styling Details
- Using your Quarter Scale Patterns
- Why Do I Need Darts? They're so UGLY!
- Why Do I Need a Dress Block? Can't I just re-design a purchased pattern?