- Clothing Patterns 101
- Using the Fitting Pattern
- Fitting the Pants Block - Final Fitting
Final Fitting of the Pants Block
We've completed the initial fitting of the pants block. Now we'll take a look at the pant after the initial adjustments have been made.
After marking the changes on your initial pant fitting, you'll re-stitch the pant along the marked lines.
In addition to marking the new seam lines and dart lines, please note that I also marked the waistline on the pant (below).
The pant looks much better already!
Now, mark any other changes you want to make, using a different color pen. I used red (see photos, below).
I really didn't feel this needed any more changes, so I just marked darts at the correct length (they weren't usually the same length on each side), evened out the waistline, and marked an "X" on the side of the pant that fit best.

It's virtually impossible to pin each side of the pant exactly the same way. Look closely at the pant on the form (or, ideally, on yourself), and mark the side that looks best. When you take the pant apart, THAT is the side that you will copy for your block.


Take the pant apart along the stitch lines, cutting off ALL seam allowances.
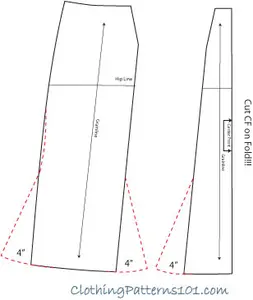
I laid the new pant over the original paper pattern so you can see the changes more clearly.
The original pant had very straight sides and center back seam, to allow the pant to be pulled on without a zipper. The pant was drawn in at the waist with a drawstring or elastic rather than shaped with darts and curved seams.
Pay special attention to the center back crotch seam. The original is straight up from the curve, which is not typical of a fitted pant (again, this was meant to add fullness at the waist for ease of wear). After pinching out the "dart" shape at that seam, the new shape is much more typical of a back crotch seam - angled away from the curve. It fits much better over the buttocks that way!
You can also see that the side seams and the inseam have a bit of shape instead of the straight, boxy leg of the original. It's still a fairly full leg, but there is some shape at the hip and inside the leg (to balance the adjustments to the outer leg seam).
The front pant didn't change nearly as much as the back. The crotch curve of the front is fine; the front crotch seam SHOULD be straight up from the curve. There is no angle or "dart" in the front.
The curves at the hip (outer seam) and thigh (inseam) match those of the back leg.
The front leg is not as wide as the back, but it wasn't on the original pattern, either. A front leg should always be more narrow than the back.
This pant (the muslin version) can now be traced to cardstock and marked, as you did with the dress block.

What's the Next Step?
You're ready to start designing pants! Flared (or boot cut), tapered, shaped yokes - there are lots of options!
Need More Help with Fitting Issues?
The examples on this site reflect MY fitting issues and how I resolved them. Your body is likely very different.
But, since this is a site about the mechanics of making patterns and not specifically about fitting, I'm not going to address other fit issues here. And believe me, there are others who can address this issue better than me.
Any of the books listed below will help you achieve good fit. You can use the techniques on any pattern; but why make the same corrections over an over again? Apply the principles to your block, and the fit corrections YOU need will be automatically built in to every pattern you make!
I can recommend any of the following books and an online courses to help you achieve good fit, no matter what your size or shape. I own or have used almost all of the books on this list, and have been pleased with how they address fit problems.
And there are a couple that address plus sizes, too!
Click on the links below to go to the item in Amazon. As an Amazon Associate I earn from qualifying purchases. This helps to keep this site free for your use. You are free to search Amazon for these or other similar items without using the affiliate links on this page.
I am also an affiliate of Craftsy, and receive a small commission on their classes. I have taken several Craftsy classes, and highly recommend them. Click on the text links, below, to find the classes at the Craftsy site. You may need to become a member to access the classes.
- Pattern Fitting With Confidence - A very useful book written by the late Nancy Zieman, host of the TV series "Sewing with Nancy". She provides a straightforward, down-to-earth approach to sewing and fitting. Very user-friendly.
- The Complete Photo Guide to Perfect Fitting - I love this book!!! So wonderfully illustrated with photos, using commercial patterns to demonstrate the pattern alterations. It addresses almost any fit problem you might have. So easy to understand and follow!
-Sewing for Plus Sizes - Creating Clothes that Fit and Flatter - A great book for Plus sizes! As a woman gets larger, it's not just the measurements that change - our overall proportions shift, too. This book addresses the different body types and proportions you commonly see in larger women. Truly helpful for larger women.
- Fitting Solo from Measurements to Muslin - This class shows you how to take your own measuements (fundamental to creating your block), and then make adjustments to the pattern (make these changes to the FITTING pattern for a perfectly fitted block!). You will also make a muslin, as I have described in the block-making process. It's kind of like the instructions on this site, but with video demonstrations!- Pattern Alterations: Fixing Fit Issues - This course covers pattern alterations to correct a gaping neckline, sleeve issues (including fitting the bicep), and making adjustments to the abdomen and seat areas.
- Plus Size Pattern Fitting and Design - As a size 16 (and only 5'2" tall), I qualify as a Plus size. And I've taken this class with Barbara Deckert - it is FABULOUS! Aside from the fitting tips, she also explains the style lines and silhouettes that are flattering to the Plus size figure. I highly recommend this class!
Step-by-Step: Making and Fitting Your Block


Return to Clothing Patterns 101 Home Page
ClothingPatterns101.com does not sell the personal information of its users to anyone, ever.
What's New - The Latest News in Sewing and Recent Articles on ClothingPatterns101
-
Add Flare to Your Gored Skirt with a Trumpet
 A trumpet skirt is a gored skirt with flare added at the hem only. The result is a skirt that fits closely through the hip, then flares out like a trumpet!
 -
Waist treatments finish your pant or skirt with style
Waist treatments finish your skirt or pants with style. Opt for a simple waistband, or something more decorative! -
Add a Waistband to Finish Your Skirt or Pant
A waistband is the most common finishing touch for a skirt or pant. It allows the garment to "hang" freely from the waist while allowing ample room for movement.
Tips and Techniques!
Watch videos that demonstrate the techniques you will use to design your patterns. And get tips to make the process easier!
Videos are added periodically, so keep checking back!
- More on Pattern Manipulations to Move Darts and Add Fullness
- More on Using Quarter Scale Patterns
- Style vs Fashion - Do You Know the Difference?
- Patternmaking Tools to Get You Started
- How Collars Work
- Sewing Gifts for Your Friends - or for You!
- The Difference Between Sewing Ease and Style or Fit Ease
- Do You Speak the "Language of Patterns"?
- Even the Greatest Style Falls Flat if it's Out of Proportion
- Where Do You Find Design Inspiration?
- Do You Have Trouble Fitting The Bust?
- What are Style Lines?
- Flat Pattern vs. draping
- The Difference Between Fit Ease and Style Ease
- Don't Make MY Mistakes! Do a Proper Muslin Fitting
- What Does It Mean to "True Your Pattern?"
- Using Basic Pattern Techniques
- Customize your Body Form
- Slashing and Spreading your Pattern to add Fullness
- Turning your Darts into Styling Details
- Using your Quarter Scale Patterns
- Why Do I Need Darts? They're so UGLY!
- Why Do I Need a Dress Block? Can't I just re-design a purchased pattern?