- Clothing Patterns 101
- Pant and Shorts Styles
- Flare Pant
How to Draft a Flare Pant Pattern
Creating a flare pant pattern is easy.
There are many variations to the flare pant shape, but the principles to adding flare are basically the same.
Whether you're looking for a wide-leg pant that flares from the hip or a simple boot-cut flare, we're here to show you how to do it!
Before you create these pant styles, you'll need a well-fitting pant block. You can create your pant block using a commercial pattern, or by drafting it from your own measurements. Drafting can be a bit complicated, but Craftsy's course, Patternmaking + Design: the Pants Sloper will walk you through it.
Pant Flared from the Hip
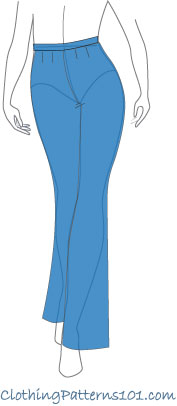
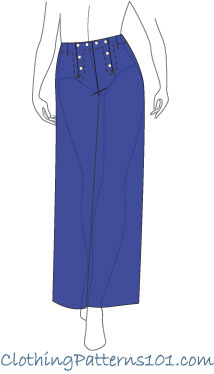
Women's wide leg pants are flared from the hip and have an easy-going style.
The fit, in this case, is the same as the pant block through the waist and upper hip - we are not creating a full, pull-on pant. The fit is smooth through the waist and high hip.
These pants begin to flare at the hip, to the hemline. These are not the bell-bottoms of the 1960's, which flared from the thigh or knee. They are more reminiscent of a sailor-style pant.
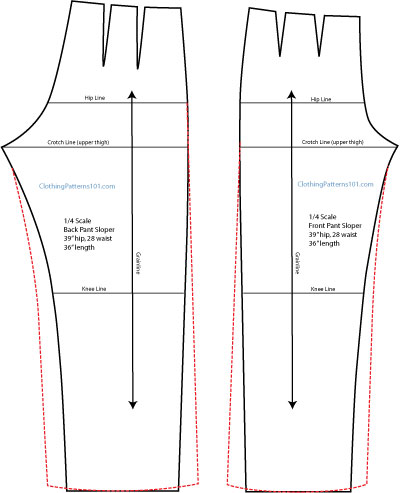
To create the flare, start from the hip line at the outseam.
Draw a line from the hip to the hemline, adding as much as you wish. I've drawn about 1" to 1 1/2" at the side hem - but even that small amount will add up to 4 - 6" additional all around each leg!
On the inseam, start just below the crotch and draw your line to the hem - adding the same amount you added to the outer side!! - but this line will have a little bit of a curve (just as the original inseam curves a bit below the crotch).
Make the same alterations on the front and back pant leg. It is critical to add the same amount to the hemline on each side of the leg (inseam and outseam), and to the front and back leg. This keeps the leg balanced so it will hang properly, without skewing
Pant Flared from the Knee
A pant flared from the knee can be as subtle as a boot-cut jean, or as extreme as a vintage bell-bottom. It depends entirely on how much, or how little, you add at the hemline.
In this case, we will not only add flare to the lower part of the leg, we will accentuate that flare a bit by tapering the leg just a tiny bit though the thigh.
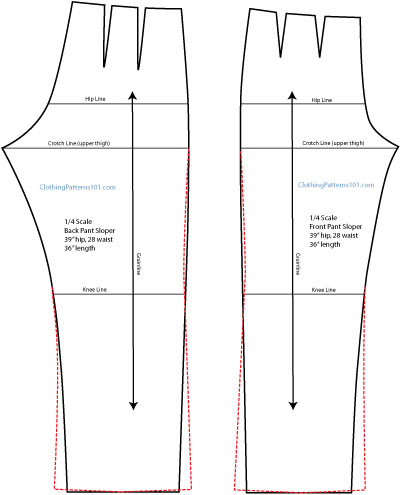
Start, again, at the outseam. I've started at the hip, and tapered just a bit, toward the knee (I've tapered in only about 1/4" at the knee).
Then, from the knee, the line angles out to the hemline. I've added less than 1" at the side hem - for a boot cut leg, add only about 1/2" to 3/4" at each side of the leg. For a bell bottom, you can add 1 1/2" for a nice flare.
On the inseam, just start at the knee line and add the same amount at the hem that you added to the outseam. Make the lines at both the inseam and outseam smooth and continuous.
Make the same alterations on the front and back pant leg. Add the same amount to the hemline on each side of the leg (inseam and outseam), and to the front and back leg.
Once you're comfortable with how to create a flared pant leg, the variations are endless!
The leg can be flared from the thigh as well as the hip or knee.
If you taper the upper part of the leg (like we did with the flare from the knee), it makes the flare below the knee appear to be much larger than it really is - you'll get a pronounced flare even if you don't add too much to the total circumference at the hem.
Just be sure to balance the leg by adding the same amount on each side of the leg, and on the front and back leg.
This page shows how to draft a pant pattern using your pant block. Remember to finish your pant with hems and seam allowances!
More Pant Styles
|
More Waist Treatments
Return to Clothing Patterns 101 Home Page
ClothingPatterns101.com does not sell the personal information of its users to anyone, ever.

