- Clothing Patterns 101
- Drop Waist Dress
How to Draft a Drop Waist Dress
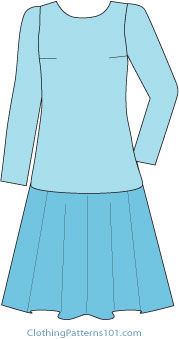
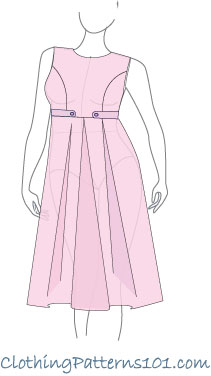
A drop waist dress is flattering on almost any figure. With a semi-fitted top over a fuller skirt, the dress has proportions that balance the body well.
This dress is very easy to wear and can be made in a casual or dressy fashion, depending on the fabrics used.
The proportions of this dress make almost anyone look long and lean!
Before you create these dress, skirt or blouse styles, you'll need a well-fitting dress block. You can create one from a commercial pattern, fitting the block to your measurements and shape.
If you'd prefer to draft a block from your own measurements, Craftsy has courses in Patternmaking Basics: the Bodice Sloper and
Patternmaking Basics: the Skirt Sloper
|
The bodice is really just your blouse block - really, nothing to it! Just put a zipper in the back instead of a button overlap on the front. You can use the waist darts if you want a close-fitting bodice on the dress, but I've illustrated it without the darts for a more relaxed fit. The skirt can be almost any shape or style you like - I've done a circle skirt here, for a flirty look, but you could also do pleats, gores, or keep it relatively straight (using the waist seam as a style feature, changing the color or fabric of the skirt). |
Drafting the Dropped Waist Dress
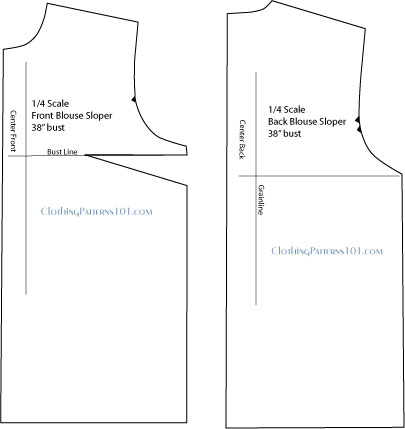
The bodice is simply your basic blouse or blouse block. Even the sleeve (on this version) is the straight sleeve from the basic blouse!
You can use the fitted blouse pattern, too, if you want the bodice to fit more closely than it's drawn in this version.
The only difference is that the opening will be in the back instead of the front.
When you are finishing your pattern, don't add a button extension to the front; cut the front ON THE FOLD.
On the back, add a seam allowance at center back for a zipper.
Simple as that!
Since I've used a circle skirt, there is MATH involved! See the directions for a basic circle skirt here; below are the variations for dropped waist version.
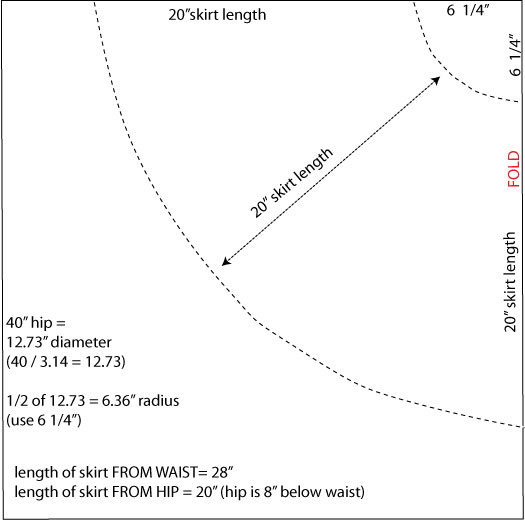
The skirt will sit at the hip, not the waist, and must fit the bottom of the blouse pattern. I've used 40" as the total circumference of the bottom of the blouse.
40" divided by 3.14 (PI) = 12.73" (diameter of the hip opening). Divide that in half again (6.36) for the radius of the opening. I'd round that off to 6 1/4" for drafting the skirt.
Since the skirt will be worn at the hip level, you'll also have to adjust the length of the skirt. The circle skirt worn at the waist was 28" long; since the hip/bottom of the blouse is about 8" below the waist, cut the skirt for this dress at 20" instead. It will hit the leg in the same place as the skirt worn from the waist (below the knee).
This page shows how to draft a dress pattern using your dress block. Remember to finish your dress with hems and seam allowances!
What's the Next Step?
All of the dresses shown above require a center back zipper, so your back pattern will need a seam allowance to accommodate the zipper (22" is a good length). The front pieces will be cut on the fold.
Decide if you want to add sleeves, and what style of sleeve. If you use a blouse sleeve, remember to lower the armhole of the dress, just as you did on the basic blouse. You'll have a bit more room to move, and you can use your blouse sleeve to draft your dress sleeve.
You can also choose a different neckline or add a collar, too.
Then finish your pattern with a hem, seam allowances, and markings, and you're ready to make your new dress or blouse!
More Dresses
Return to Clothing Patterns 101 Home Page
ClothingPatterns101.com does not sell the personal information of its users to anyone, ever.
