- Clothing Patterns 101
- Waist Treatments
- Paperbag Waist
A Paperbag Waist is Casual and Fun!
The Paperbag waist is often used on "pajama" style pants.
What could be more casual or fun than that?
But it can also be used on short or a skirt. Imagine running errands or sightseeing on vacation in a cool, cotton skirt with a gathered paperbag waist!
|
The waistline of a paperbag pant or skirt is gathered with a drawstring. The waist is therefore easily adjustable for those days when you don't want it quite as snug as usual. Beyond that, the feature that makes it a paperbag (rather than simply a gathered waist) is the ruffle created by the drawstring. The waist is extended, usually 1" - 2" above the natural waist, and folded back on itself to create a faced ruffle and the drawstring casing. When the drawstring is pulled and tied, you have a ruffled waist! |

Drafting the Paperbag Waist
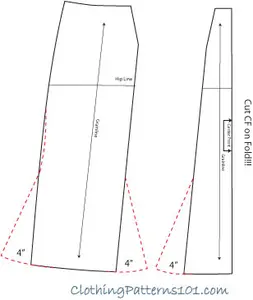
The paperbag illustrated below has a 1 1/2" ruffle with a fold-back facing. The fold-back is 2" to both face the ruffle and create the drawstring casing at the waist.
Add an extra 1/2" at the side seam for more room at the hip and to get into the garment - this is a pull-on pant or skirt, so there needs to be ample room to go over the hips.

Trace a copy of your pant or skirt pattern and make sure there is another 5 or 6" at the top for drafting the ruffle.
At the top/waist edge of the pattern, extend the pattern upward 3 1/2". That's 1 1/2" for the ruffle and 2" for the fold-back (follow the red dashed lines).
Add 1/2" in width at the side seam, and extend the side seam STRAIGHT up to the top of the waist extension - we'll be ignoring the darts, and making the side straight gives even more fullness at the waist for the ruffle. The red dashed line above also shows you this.
Continue the red line at the side, adding the extra 1/2" all the way to the hem.
The sketch below shows the final pattern.

Your final pattern will have an extension at the waist, which should be marked to indicate where to fold the top edge to create the ruffle facing.
YOU ALSO NEED BUTTONHOLES, one on either side of the center front seam, for the drawstring to come out. STITCH THE BUTTONHOLES BEFORE STITCHING THE FACING IN PLACE.
The dashed red line on the sketch above is the bottom edge of the facing. Stitch it down, and then stitch 1/2" above that stitch line (the dashed blue line). The drawstring will be threaded in the casing that results from those 2 rows of stitching. The drawstring sits at the natural waist.
This pattern will have a STRAIGHT side seam - so, depending on the fabric you use, you could tape the front and back together at the sides and eliminate the side seam.
It may seem like a lot of steps for such a simple garment, but it's really just adding a generous extension to the top waist and adding a bit at the sides. Remember to stitch the buttonholes before folding the facing and stitching in place.
It's really pretty simple!
More Waist Treatments


Return to Clothing Patterns 101 Home Page
ClothingPatterns101.com does not sell the personal information of its users to anyone, ever.
What's New - The Latest News in Sewing and Recent Articles on ClothingPatterns101
-
Add Flare to Your Gored Skirt with a Trumpet
 A trumpet skirt is a gored skirt with flare added at the hem only. The result is a skirt that fits closely through the hip, then flares out like a trumpet!
 -
Waist treatments finish your pant or skirt with style
Waist treatments finish your skirt or pants with style. Opt for a simple waistband, or something more decorative! -
Add a Waistband to Finish Your Skirt or Pant
A waistband is the most common finishing touch for a skirt or pant. It allows the garment to "hang" freely from the waist while allowing ample room for movement.
Tips and Techniques!
Watch videos that demonstrate the techniques you will use to design your patterns. And get tips to make the process easier!
Videos are added periodically, so keep checking back!
- More on Pattern Manipulations to Move Darts and Add Fullness
- More on Using Quarter Scale Patterns
- Style vs Fashion - Do You Know the Difference?
- Patternmaking Tools to Get You Started
- How Collars Work
- Sewing Gifts for Your Friends - or for You!
- The Difference Between Sewing Ease and Style or Fit Ease
- Do You Speak the "Language of Patterns"?
- Even the Greatest Style Falls Flat if it's Out of Proportion
- Where Do You Find Design Inspiration?
- Do You Have Trouble Fitting The Bust?
- What are Style Lines?
- Flat Pattern vs. draping
- The Difference Between Fit Ease and Style Ease
- Don't Make MY Mistakes! Do a Proper Muslin Fitting
- What Does It Mean to "True Your Pattern?"
- Using Basic Pattern Techniques
- Customize your Body Form
- Slashing and Spreading your Pattern to add Fullness
- Turning your Darts into Styling Details
- Using your Quarter Scale Patterns
- Why Do I Need Darts? They're so UGLY!
- Why Do I Need a Dress Block? Can't I just re-design a purchased pattern?