- Clothing Patterns 101
- Waist Treatments
- High or Low Waists
Go High or Go Low! For Your Waistline, I mean...
Most pants or skirts sit at the natural waist. A high or low waistline is a style choice - and it can make a real difference in your garment.
A low-rise pant sits about 1 1/2" to 2" below your natural waist, and reveals your navel if you're wearing a cropped top.
A high waist is much like a built-on waistband. It can extend 1' - 2" above the natural waist and looks best when you show it off with a close-fitting, tucked-in top or blouse.
|
A high waist is very retro - think Katherine Hepburn in her iconic pleated, cuffed pants. She wore pants when no other woman would be seen in them publicly! A low rise is more modern, although it was also very trendy back in the 1960's (they were called "hip huggers" back then). Whether you choose high or low, it can be a great look! |

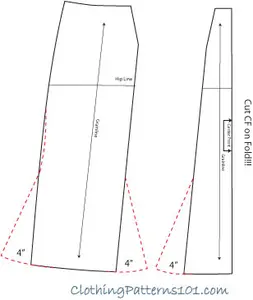
Drafting a Low-Rise Pant or Skirt
Drafting the low-rise waist is absolutely the easiest pattern draft there is!
Just decide how low you want to go (I've shown 2"), then trace a copy of your pattern, draw a line that follows the curve of the waistline 2" below the waist edge - and cut it off!
Yeah, that's it. You've got your low-waist pant (or skirt)!
I recommend finishing it with a facing, as a straight waistband will sit awkwardly at your high hip.

Drafting the High Waist Pant or Skirt
Drafting a high waist is quite a bit more complicated, but if you take it step-by-step, you'll do fine.
You'll need a traced copy of your pant or skirt block and a traced copy of the lower 3" - 4" of your front and back bodice block.
You'll need the lower portion of the bodice blocks because the curves of the body don't allow you to simply add to the top of the waist edge. The waist won't fit properly if you just extend it straight upward from the top of the skirt or pant pattern.
|
Start by moving the double darts in the pant or skirt block to the center of the panel, and combine them into one dart. (Obviously, if you only have one dart to begin with, this step won't be necessary). For example, if you have 2 darts, each 3/4" wide at the top, create ONE dart, 1 1/2" wide, at the center of the pant or skirt panel (I've shown that with red lines, at left). This dart should closely match the waist dart on the bodice, both in width and placement. |

Then, lay the bodice pattern (or the bottom 3"-4" that you traced) directly over the corresponding pant or skirt pattern (front bodice over front pant, as shown here). Mark the height you want to use for your high waist (I'm showing 2"), draw a line across the bodice at that point, and cut.
The bodice pieces you just cut off will be taped to the pant/skirt pattern tracing for the new waistline.
|
The resulting pieces will look much like the ones at right - the pant (or skirt) pattern plus the pieces cut from the bodice patterns. Notice that the extension has a dart shape in the middle just like the pant/skirt does. But the "legs" of that cut-off dart angle in the opposite direction of the dart in the lower pattern. THIS IS EXACTLY WHAT YOU NEED! |

The shaped, cut-off dart helps the waistline of the garment hug your waistline.
The side seam also flares out a bit above the waist. That's also part of the shaping that you need. You can smooth the side seam a bit at that point, but don't do too much. You need that shape for fit.
|
Your finished pattern should look like the one at left. I've marked the natural waistline using a continuous dashed line for illustration purposes only. On your pattern, it helps to have the natural waist marked on the parts you will be cutting. Finish your waistline with a facing, as a waistband would be a bit too much on this garment! |

More Waist Treatments


Return to Clothing Patterns 101 Home Page
ClothingPatterns101.com does not sell the personal information of its users to anyone, ever.
What's New - The Latest News in Sewing and Recent Articles on ClothingPatterns101
-
Add Flare to Your Gored Skirt with a Trumpet
 A trumpet skirt is a gored skirt with flare added at the hem only. The result is a skirt that fits closely through the hip, then flares out like a trumpet!
 -
Waist treatments finish your pant or skirt with style
Waist treatments finish your skirt or pants with style. Opt for a simple waistband, or something more decorative! -
Add a Waistband to Finish Your Skirt or Pant
A waistband is the most common finishing touch for a skirt or pant. It allows the garment to "hang" freely from the waist while allowing ample room for movement.
Tips and Techniques!
Watch videos that demonstrate the techniques you will use to design your patterns. And get tips to make the process easier!
Videos are added periodically, so keep checking back!
- More on Pattern Manipulations to Move Darts and Add Fullness
- More on Using Quarter Scale Patterns
- Style vs Fashion - Do You Know the Difference?
- Patternmaking Tools to Get You Started
- How Collars Work
- Sewing Gifts for Your Friends - or for You!
- The Difference Between Sewing Ease and Style or Fit Ease
- Do You Speak the "Language of Patterns"?
- Even the Greatest Style Falls Flat if it's Out of Proportion
- Where Do You Find Design Inspiration?
- Do You Have Trouble Fitting The Bust?
- What are Style Lines?
- Flat Pattern vs. draping
- The Difference Between Fit Ease and Style Ease
- Don't Make MY Mistakes! Do a Proper Muslin Fitting
- What Does It Mean to "True Your Pattern?"
- Using Basic Pattern Techniques
- Customize your Body Form
- Slashing and Spreading your Pattern to add Fullness
- Turning your Darts into Styling Details
- Using your Quarter Scale Patterns
- Why Do I Need Darts? They're so UGLY!
- Why Do I Need a Dress Block? Can't I just re-design a purchased pattern?