- Clothing Patterns 101
- Gored Skirts
Gored Skirts Add Subtle, Even Fullness at the Hem
A gored skirt is one made of multiple panels. Unlike a pencil or A-Line skirt, which has a single panel in the front and one or two in the back, a gored skirt can have 4 to 8 panels (called "gores") - or more! - each of which adds just a bit of flare at the hem.
The more gores you have, the more fullness you can obtain at the hem - without gathers, fullness, or bulk at the waist!
|
The idea behind a multi-gored skirt is to add evenly-distributed fullness at the hem. You could, in theory, make a multi-gored skirt that is, essentially, a circle skirt. But in that case, drafting a circle is easier. The gores allow for a more subtle fullness, although you can still get a good amount of swing, as the 8-gore skirt at left illustrates. It also allows you to cut each panel on the straight grainline, with 2 slightly bias edges on each panel, which also allows for more fluidity and movement when wearing the skirt. And, of course, the seamlines themselves add a styling detail, and an opportunity for color-blocking if you choose. It's an incredibly versatile cutting technique! |

The 4-Gore Skirt
|
You could simply add flare at the hemline of an A-Line skirt, but doing so only adds fullness at the sides. You'd end up with a fairly flat, triangular-shaped skirt. Adding just one seam front and back (for a 4-gore skirt) allows you to add a bit at both sides and the center front and center back. Even if the total hem sweep (fullness) is the same, the distribution of that fullness makes a more fluid hemline. |

|
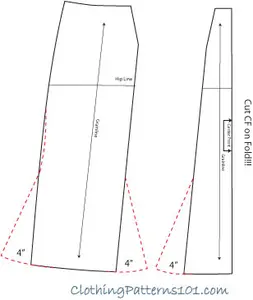
A 4-gore skirt has 2 panels in front and 2 in back. You will have a seam at center front and center back - those panels will NOT be cut on the fold. Using your skirt block, you’ll add a bit of flare at the side seam AND at CF and CB. You can add as little as 1” to each side of each panel, which adds a total of 8” to the sweep of the skirt. The shape will be only a bit wider than the A-line skirt. But because you have 4 panels, the grainlines will change, allowing the skirt to hang and move differently than the A-Line. Unlike the A-Line, the flare is not limited to the side seams, and each panel will have a straight grain in the CENTER of the panel (shown in red in the sketch), making each side of each panel slightly bias. This allows the skirt to have a bit of fluidity and movement that the A-Line does not have. Make the same adjustments on the front and back skirt panels, and you have a 4-gore skirt! |

The 6-Gore Skirt
|
|
A 6-gore skirt has 3 panels in front and 3 in back. In this case, the smaller CF and CB panels are cut on the fold, with a straight grainline down the center. This makes the front and back relatively flat, allowing the side panels to have more flare and movement. For all instructions, below, make the same adjustments on both the front and the back pattern pieces. |

|
If your skirt block has 2 waist darts, start by tracing a copy of the block and eliminating the dart closer to the side. Make the front dart wider to compensate. (If your block only has one dart, you can skip this step). Then draw a line from the point of the front dart to the hem, as shown. The Center Front section should be approximately 1/3 the width of the original pattern piece. The side section should be approximately 2/3 the width of the pattern piece. Because the Center Front and Center Back pieces will still be cut on the fold, each gore of the finished skirt will be approximately 1/6 of the TOTAL hem width when finished. The red dotted line is where you will cut and separate your pattern. |

|
After cutting your pattern pieces apart, draw a grainline on the side front (and side back} panels, centered on the panel. You can now draw flare lines from the point of the dart to the hem. You can add up to 2” of flare on each side of the side front and side back panels, and add up to 2” to the BIAS side of the center front and center back panels (remember, those will still be cut on the fold, with a vertical grainline along the fold line). This will add up to 24” to the sweep of the skirt - which is A LOT. Then smooth the area where the flare line meets the point of the dart into a subtle curve, which will be easier to sew and lay more smoothly on the body. |

The hip line should be adjusted to be perpendicular to the grainline, but it must meet the hip line of the center panel. (Add notches at the hip line to show you where they meet, when stitching the skirt).
You now have a 6-gore skirt, with plenty of swing!
The 8-Gore Skirt
|
By now, I'm sure you have a good idea of how gores work, adding more and more fullness the the skirt while maintaining a smooth fit at the waist. An 8-gore skirt, as you can imagine, can be quite full, if you want it to be. The 8-gore skirt has 4 panels in front and 4 in back. There is a seam at center front and at center back (or, as shown, an opening at center front) - as well as seams on each side of center, and, of course, the side seams. The process is very similar to the 6-gore skirt, but the skirt block panels are separated at a different point - AND the CF and CB are NOT cut on the fold. |
|
|
Draw a line from the point of the dart to the hem Cut along that line to separate the panels. You should have 2 panels of approximately the same width at the hem. |

|
Add 2” to each side of each of the SIDE FRONT and SIDE BACK panels. Then add 2” to the BIAS side ONLY of the center front and center back panels. Even though there will be a seam at CF and CB, do NOT add flare or alter the seamline at CF and CB. Those panels will hang better if they remain on the straight of grain, especially if you choose to have an opening at center front (as shown in the sketch). You’ll need a straight grain to support the placket. The 2" additions as described above will add up to 24” to the sweep of the skirt, like the 6-gore skirt. Smooth the lines at the point of the dart for better fit. Draw a new grainline on the SIDE panel only, centered in the panel and perpendicular to the hip line. Do NOT change the grainline on the center front or center back panels., especially if you are going to use a front opening like the one in the sketch. |
|

How much you choose to add to each gore will depend on the fabric you choose, as well as the result you're looking for. Feel free to experiment! You could add 2" to each side of the 4-gore skirt, or only 1" or 1 1/2" to each panel of the 6 or 8-gore skirt.
Remember, a firmer, stiffer fabric will flare out more, and a softer, more fluid fabric will have more swing and movement.
More Skirts


More Waist Treatments


Return to Clothing Patterns 101 Home Page
ClothingPatterns101.com does not sell the personal information of its users to anyone, ever.
What's New - The Latest News in Sewing and Recent Articles on ClothingPatterns101
-
Add Flare to Your Gored Skirt with a Trumpet
 A trumpet skirt is a gored skirt with flare added at the hem only. The result is a skirt that fits closely through the hip, then flares out like a trumpet!
 -
Waist treatments finish your pant or skirt with style
Waist treatments finish your skirt or pants with style. Opt for a simple waistband, or something more decorative! -
Add a Waistband to Finish Your Skirt or Pant
A waistband is the most common finishing touch for a skirt or pant. It allows the garment to "hang" freely from the waist while allowing ample room for movement.
Tips and Techniques!
Watch videos that demonstrate the techniques you will use to design your patterns. And get tips to make the process easier!
Videos are added periodically, so keep checking back!
- More on Pattern Manipulations to Move Darts and Add Fullness
- More on Using Quarter Scale Patterns
- Style vs Fashion - Do You Know the Difference?
- Patternmaking Tools to Get You Started
- How Collars Work
- Sewing Gifts for Your Friends - or for You!
- The Difference Between Sewing Ease and Style or Fit Ease
- Do You Speak the "Language of Patterns"?
- Even the Greatest Style Falls Flat if it's Out of Proportion
- Where Do You Find Design Inspiration?
- Do You Have Trouble Fitting The Bust?
- What are Style Lines?
- Flat Pattern vs. draping
- The Difference Between Fit Ease and Style Ease
- Don't Make MY Mistakes! Do a Proper Muslin Fitting
- What Does It Mean to "True Your Pattern?"
- Using Basic Pattern Techniques
- Customize your Body Form
- Slashing and Spreading your Pattern to add Fullness
- Turning your Darts into Styling Details
- Using your Quarter Scale Patterns
- Why Do I Need Darts? They're so UGLY!
- Why Do I Need a Dress Block? Can't I just re-design a purchased pattern?