It's World Kindness Day! Make a Beanie Hat to Keep Someone Warm!
|
The 13th of November each year is World Kindness Day. As a seamstress, how can you contribute a bit of kindness to the world? There are plenty of opportunities for you to stitch something to help someone in need. My suggestion: Make a beanie hat to keep someone warm! |
 |
 |
The beanie I'm wearing is super easy to make (you can find the pattern using this link), and you can make several of them from a single yard of fabric. |
I bought 2 yards of polar fleece, in co-ordinating colors. I'll make some hats in black with a plaid cuff and some as pictured, using equal amounts of both fabrics. You could also line the crown of the hat for extra warmth.
The cuff at the bottom of the hat is relatively wide and is 2 layers thick. It hugs the head nicely and covers the ears to keep them warm.
These hats could be donated to hospitals for cancer patients, or any patients that need extra warmth. You could also donate them to a homeless shelter or senior center.
The pattern includes sizes for children, plus adult sizes Small to Large.
How to stitch the beanie hat
To make the beanie:
1. Cut the pieces from Polar Fleece or Cotton Interlock (the fleece will be warmer). Cut 5 crown pieces for each hat.
1a. If you choose to line the hat for extra warmth, cut another 5 pieces, in the same or co-ordinating fabric.
2. Cut the cuff for the bottom of the hat. Cut only one piece for the cuff; it could match the crown fabric or contrast, as you prefer. THE MEASUREMENTS FOR THE CUFF ARE ON THE PATTERN PIECE.
3. To sew the crown, join the triangular pieces together, using 1/4" seam allowances. Your seam should stop 1/4" from the top of the triangle to allow all of the pieces to come together smoothly at the top.
3a. If you are lining the hat, stitch the lining in the same manner. Then set the lining inside the crown, WRONG sides together, and baste the layers together along the bottom edge.
4. To sew the cuff, join the short sides with a 1/4" seam allowance, making a circle of the fabric. Then fold in half with the long edges together, tucking the seam allowance on the inside of the cuff. You can baste the edges together if you'd like.
5. Set the cuff to the hat, right sides together. Pull gently on the fabric as you stitch, allowing the fabric to stretch when worn.
The seam allowances will be exposed on the INSIDE of the hat, but the fabric is soft and the allowances won't be noticed. (We're making this easy so you can donate the hats quickly!) Trim the seam allowance if needed, to make it look neat.
Turn the hat right side out, and you're done!
Your local hospital, senior center, or homeless shelter will be forever grateful for your kind and generous gift!
Return to Clothing Patterns 101 Home Page
ClothingPatterns101.com does not sell the personal information of its users to anyone, ever.
What's New - The Latest News in Sewing and Recent Articles on ClothingPatterns101
-
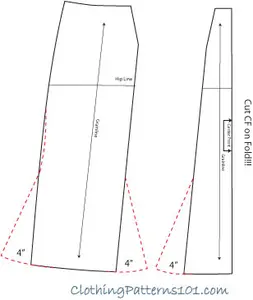
Add Flare to Your Gored Skirt with a Trumpet
 A trumpet skirt is a gored skirt with flare added at the hem only. The result is a skirt that fits closely through the hip, then flares out like a trumpet!
 -
Waist treatments finish your pant or skirt with style
Waist treatments finish your skirt or pants with style. Opt for a simple waistband, or something more decorative! -
Add a Waistband to Finish Your Skirt or Pant
A waistband is the most common finishing touch for a skirt or pant. It allows the garment to "hang" freely from the waist while allowing ample room for movement.
Tips and Techniques!
Watch videos that demonstrate the techniques you will use to design your patterns. And get tips to make the process easier!
Videos are added periodically, so keep checking back!
- More on Pattern Manipulations to Move Darts and Add Fullness
- More on Using Quarter Scale Patterns
- Style vs Fashion - Do You Know the Difference?
- Patternmaking Tools to Get You Started
- How Collars Work
- Sewing Gifts for Your Friends - or for You!
- The Difference Between Sewing Ease and Style or Fit Ease
- Do You Speak the "Language of Patterns"?
- Even the Greatest Style Falls Flat if it's Out of Proportion
- Where Do You Find Design Inspiration?
- Do You Have Trouble Fitting The Bust?
- What are Style Lines?
- Flat Pattern vs. draping
- The Difference Between Fit Ease and Style Ease
- Don't Make MY Mistakes! Do a Proper Muslin Fitting
- What Does It Mean to "True Your Pattern?"
- Using Basic Pattern Techniques
- Customize your Body Form
- Slashing and Spreading your Pattern to add Fullness
- Turning your Darts into Styling Details
- Using your Quarter Scale Patterns
- Why Do I Need Darts? They're so UGLY!
- Why Do I Need a Dress Block? Can't I just re-design a purchased pattern?