- Clothing Patterns 101
- Necklines and Collars
- Notched Neckline and V-Neck
The Notched Neckline and V-Neck
There are few details easier than a notched neckline (or a V-neck), but both are nice variations from the basic rounded opening. I find that a V or small vent is more flattering than a rounded neck treatment. It draws the eye upward, toward your lovely face, while still offering modesty - and, of course, a bit of style!

Notched neckline
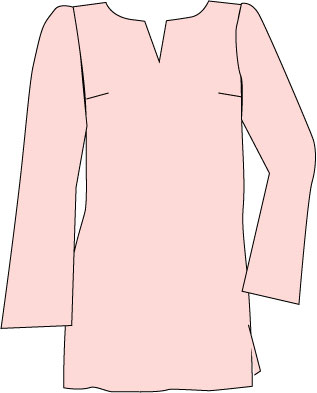
This simple detail transforms the basic blouse or top into a fashion statement, without fussiness (in the drafting, sewing or wearing). It reveals a tiny pendant on a chain, or, with a really great button to close the very top of the notch, it's a statement in itself.
Drafting the little vent couldn't be easier.
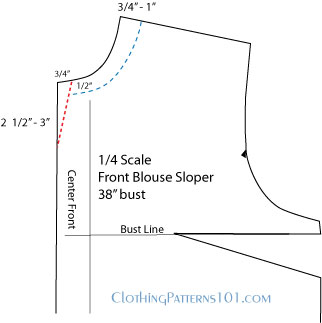
The vent looks best at about 2 1/2" to 3" in length. Make a mark at that point, down from the center front neck.
For an open vent, make another mark 3/4" to 1" from the center front, along the neckline. Draw a line between the two marks - easy! That's it!
If you want a slightly larger and wider neckline, like the one shown above (to pull over the head more easily), just "scoop out" the neck a bit.

I like it a bit wider, so I'd widen the neck about 3/4" to 1" on each side, and lower it about 1/2" at the front (following the BLUE dashed lines).
Widen the back the same as the front, but I usually lower the back neck only about 1/4 - 1/2".
If you want to close the vent at the top with a cool button or brooch,
just cut the vent along the center front line; don't angle it like the
sketch. The corners must meet at the top for the button or pin, so you really just need a slit at the front neck.
This neckline is best finished with a facing.

V-Neck
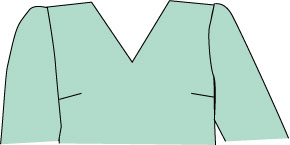
The V-neck is another easy variation on the basic neckline, and one I find especially flattering. It looks great filled in with a necklace.
Drafting this neckline is even easier than the notch.
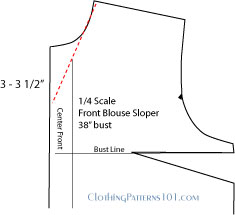
Your center front mark is just a bit lower (for balance with the width) - go about 3" to 3 1/2" down from the center front neckline.
Then just draw a line from that mark to the shoulder point. You could make that line a gentle curve if you prefer, but the straight line will work just fine. That's it!!
Again, the back neck needs no modification.
This neckline can be finished with a facing, bias tape, or, if made in a knit, use a ribbed band.
And, of course, you can make it deeper or wider if you prefer.
Could anything be easier?
This is a great way to get your feet wet if you're new to pattern design and uncomfortable with collars.
You'll find MUCH more information about collars and necklines in the in-depth tutorial, A Beginner's Guide to Necklines and Collars. Learn to draft cowl necklines, shawl collars, stand collars, shirt collars, scoop necklines, squared necklines - and variations of all of these!
Check out the Beginner's Guide to Necklines and Collars now!
More Collars and Necklines
Return to Clothing Patterns 101 Home Page
ClothingPatterns101.com does not sell the personal information of its users to anyone, ever.

